rds — see “After it’s online” below.RockDesk on an ESP32
A small always-on board that sits on a LAN under its own RockDesk ID. From anywhere you can wake a computer there, reach that network’s web pages and ssh through it, see and hear through the board’s camera and mic, and watch your own computers on its screen — and your AI agent can drive it with the same rds commands it uses for computers. Free; it doesn’t count toward your devices.
1What you need
- An LCSC “Shizhanpai” ESP32-S3 board (立创·实战派 ESP32-S3: 2-inch touchscreen, camera, mic and speaker). Other boards aren’t supported yet.
- A computer with Chrome or Edge (flashing uses Web Serial) and a USB-C data cable.
2Flash it
Plug the board into this computer, click Install and pick its port (macOS: cu.usbmodem…; Windows: “USB JTAG/serial debug unit”; Linux: /dev/ttyACM0, you may need to be in the dialout group). This replaces the firmware on the board, such as xiaozhi. If xiaozhi already set up Wi-Fi, don’t tick Erase device: the board will reuse that Wi-Fi.
Firmware 1.0.9 · about 4 MB · takes a minute or two
3Connect it to Wi-Fi
Right after flashing, the same dialog asks for Wi-Fi: pick the network and type its password. The board joins, shows its 9-digit ID on its screen, and Visit Device brings you back here with the ID filled in. To change networks later, plug it in and click Install again — the dialog offers Change Wi-Fi.
4After it’s online
Connect from any RockDesk app with the board’s ID. The board decides who gets in, on its touchscreen: tap Allow, type the one-time password shown on its screen, or use the shared key your own devices already carry. Watching its camera or listening to its mic asks again on the screen, and both have their own on/off switches there.
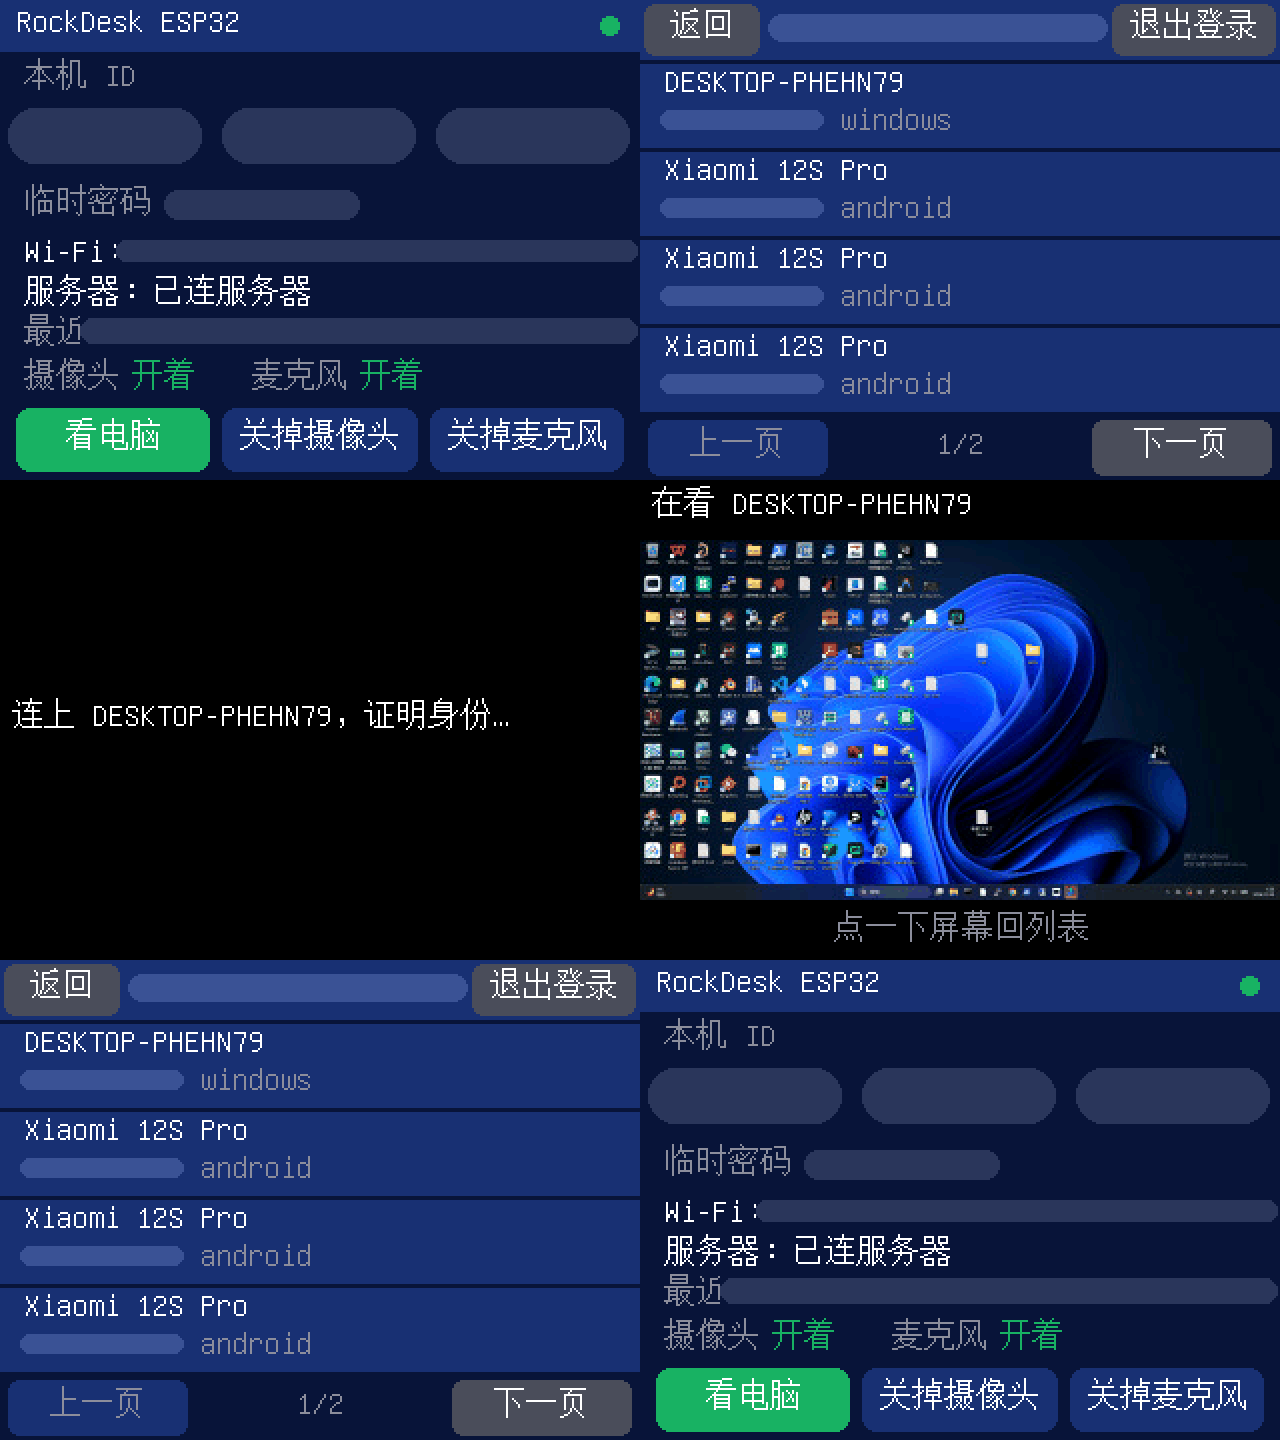
To watch one of your computers on the board, tap 看电脑 (View computer) on its home screen and sign in with your email (a code is sent there). It lists the computers on your account; tap one to see its screen. It’s view only, the computer needs RockDesk 1.0.9 or later, and the first time you open a computer the board may ask for its password, once.
With the command line (the same rds your AI agent uses):
rds <ID> shell -c help
rds <ID> wake aa:bb:cc:dd:ee:ff          # wake a computer on the board's LAN
rds <ID> forward 8080:192.168.1.1:80    # that LAN's router page, here on :8080
rds <ID> screenshot -d camera -o cam.jpg
rds <ID> shell -c 'show "Build finished"'
rds <ID> shell -c 'ask "Deploy to production?" && echo go'
rds <ID> shell -c 'gpio 10 1; sleep 0.5; gpio 10 0'
show <text> | Put a message on the board’s screen (e.g. the agent telling you it’s done). |
ask <question> | Pop up Deny / Allow on the screen and wait for a tap: exit code 0 allow, 1 deny, 2 nobody answered. A physical “are you sure?” before an agent does something risky. |
wake · power | Wake-on-LAN; press a PC’s power or reset button (needs a little wiring). |
gpio · adc · pwm · led | Drive relays, lights or a servo on the free pins (GPIO 10, 11, 21, 47; voltage on 10). Pins used by the screen, camera, audio and USB are refused. |
info · reboot | ID, firmware, Wi-Fi signal, memory; restart. |
Lines can be chained with ;, && and ||. There are no pipes, files or interactive terminal — it’s a small board.
rds,见下面「连上以后」。ESP32 版 RockDesk
一块一直开着的小板子,放在局域网里,有自己的 RockDesk ID。人在外面就能叫醒那边关着的电脑、经它连进那个局域网(路由器页面、NAS、ssh),看它的摄像头、听那边的声音;在它的屏幕上还能看自己的电脑;AI 也能像操作电脑一样用 rds 命令指挥它。免费,不占订阅的台数。
1要准备的
- 立创·实战派 ESP32-S3 开发板(2 寸触摸屏、摄像头、麦克风和喇叭)。别的板子暂时不支持。
- 一台电脑,用 Chrome 或 Edge(烧录靠浏览器的串口功能),一根能传数据的 USB-C 线。
2烧固件
把板子插到这台电脑上,点安装,选它的串口(macOS 是 cu.usbmodem…;Windows 是「USB JTAG/serial debug unit」;Linux 是 /dev/ttyACM0,可能要把自己加进 dialout 组)。这会替换板子上原来的固件(比如小智)。小智已经配过 Wi-Fi 的话,别勾「Erase device」,板子会接着用那个 Wi-Fi。
固件 1.0.9 · 约 4 MB · 一两分钟
3连 Wi-Fi
烧完同一个对话框会问 Wi-Fi:选网络、输密码。板子连上以后屏幕上显示 9 位的 ID,点 Visit Device 会回到这一页并把 ID 填好。以后要换网络:插上电脑再点一次安装,对话框里有 Change Wi-Fi。
4连上以后
在任何一个 RockDesk 里输板子的 ID 就能连。谁能进来由板子说了算,在它的触摸屏上:点允许、输屏幕上的临时密码,或者用你自己几台设备共用的那把密钥。看它的摄像头、听它的麦克风会在屏幕上再问一次,两样在屏幕上都有开关。
在板子上看自己的电脑:点首页的看电脑,用邮箱登录(验证码发到邮箱),列出账号里的电脑,点一台就能看它的屏幕。只能看、不能操作;电脑上的 RockDesk 要 1.0.9 以上;第一次看一台电脑,板子可能会要一次它的密码。
命令行(AI 用的也是这个 rds):
rds <ID> shell -c help
rds <ID> wake aa:bb:cc:dd:ee:ff          # 叫醒板子所在局域网里的电脑
rds <ID> forward 8080:192.168.1.1:80    # 那边路由器的管理页,在本机 :8080 打开
rds <ID> screenshot -d camera -o cam.jpg
rds <ID> shell -c 'show "编译好了"'
rds <ID> shell -c 'ask "要发布到生产环境吗?" && echo 发'
rds <ID> shell -c 'gpio 10 1; sleep 0.5; gpio 10 0'
show <字> | 在板子屏幕上显示一段话(比如 AI 干完活告诉你)。 |
ask <问题> | 屏幕上弹「拒绝 / 允许」等人点:允许退出码 0、拒绝 1、没人点 2。AI 做危险操作前,先要你在板子上点一下。 |
wake · power | 网络唤醒;按电脑的电源键、复位键(要接一点线)。 |
gpio · adc · pwm · led | 在空闲的脚上接继电器、灯、舵机(GPIO 10、11、21、47;读电压只有 10)。屏幕、摄像头、声音、USB 占着的脚不让动。 |
info · reboot | ID、固件、Wi-Fi 信号、内存;重启。 |
一行里可以用 ;、&&、|| 连几条。没有管道、文件、交互式终端——它就是块小板子。